A Quick Guide to Formatting Your Microsoft Word Manuscript for Amazon’s Kindle
 One daunting task for many self-publishing authors is how to get their finished book up for sale on Amazon as an ebook. It’s not as simple as just uploading your manuscript … right?
Well, it can be!
Amazon’s KDP (Kindle Direct Publishing) service gets easier to use every year. If you have a fairly straightforward manuscript – like a novel, collection of short stories, or text-only non-fiction book – you can upload your Microsoft Word document, preview it, and have a finished ebook in minutes.
In this post, I’ll explain how.
Quick note to Writers’ Huddle members – you have a much fuller version of this now available as a video seminar, with detailed step-by-step instructions. There’s also a transcript with screenshots.
Setting Up Your Paragraph and Chapter Title Styles
Many writers don’t know what styles are in Word – or why they’re so important. Styles let you quickly format a specific type of text: a “normal” paragraph, a chapter title, or anything else that you’ll be using more than once. Instead of going through each and every paragraph, manually adding an indent, and instead of painstakingly highlighting each chapter title to make it large and bold … use styles! They’re quicker for you … and they mean that Amazon’s KDP uploader can understand your document. Here’s how to set up the three most important styles for your document:#1: “Normal” Paragraphs
The default Word format is “Normal”. Word documents default to business style: each new paragraph starts flush with the left-hand margin, and there’s a blank line between paragraphs … just like there is in this blog post.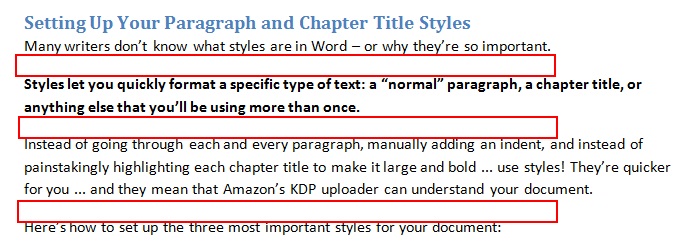 For an ebook, though, you’ll want to indent your paragraphs and remove the space between them. Here’s how:
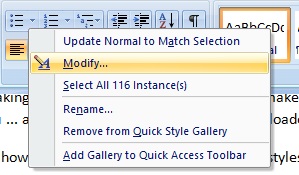
Step #1: Click the “Home” tab on the Microsoft Office ribbon: you should see a Styles pane with “Normal” as (usually) the first style. Right-click on Normal and click “Modify”
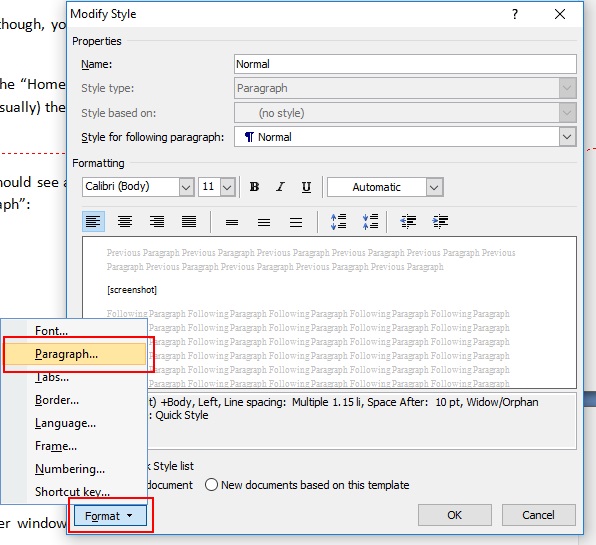
 Step #2: You should see a pop-up window. On this, click the “Format” dropdown at the bottom and select “Paragraph”:
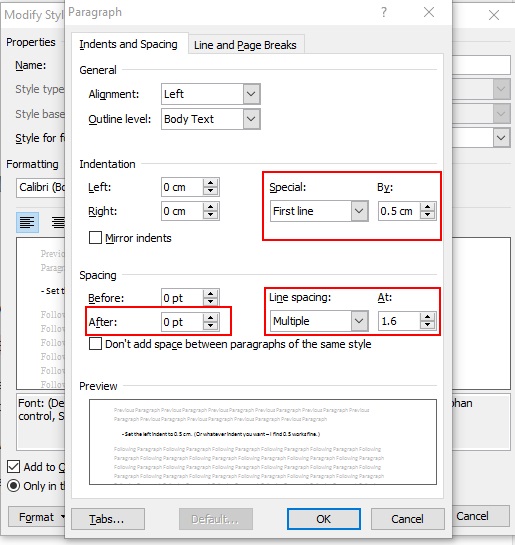
 Step #3: Another window will appear. Now:
- Under “Indentation”, set the “Special” indent to “First line” and “By” to 0.5 cm. (The default, 1.27 cm, is much too large on the Kindle.)
- In “Spacing”, set the “After” dropdown to “0”.
- (Optional) Increase the line spacing: I find that 1.15 comes out quite cramped on the Kindle and prefer to use 1.6.
 Click OK on both windows.
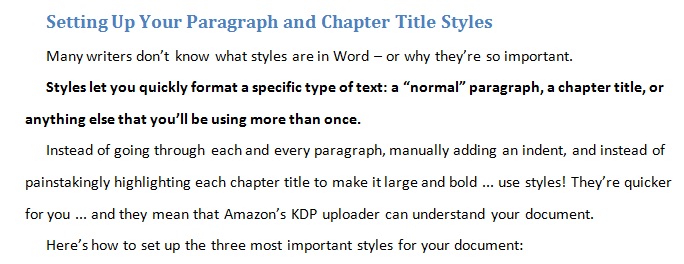
All your paragraphs should now have changed to look like this:
#2: Non-Indented Paragraphs
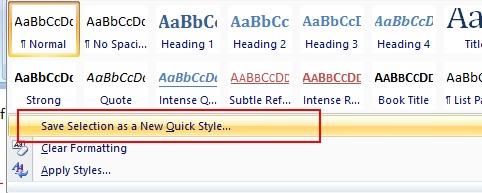
Pick up any book and you’ll see that the very first paragraph of each chapter or section, and any paragraphs after a break, are not indented. Here’s how to do this for your manuscript: Step #1: Click anywhere on a normal paragraph in your document. Then, click the “More” dropdown on the Styles pane and select “Save Selection as a New Quick Style”.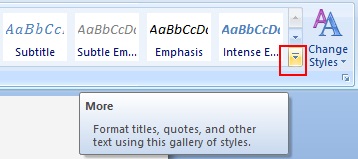
 Step #2: Enter a name for the new style. I call mine “Normal firstline”:
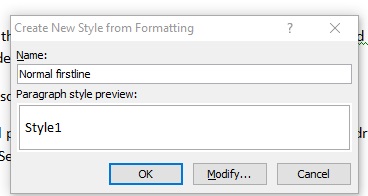 Step #3: Find your new style in the Styles pane, then right-click it and select “Modify”:
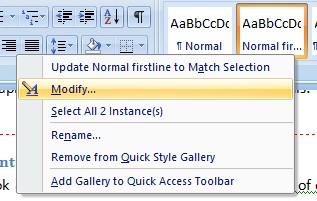 Step #4: Select Format then Paragraph. On the next screen, set the “Special” indent to “None”:
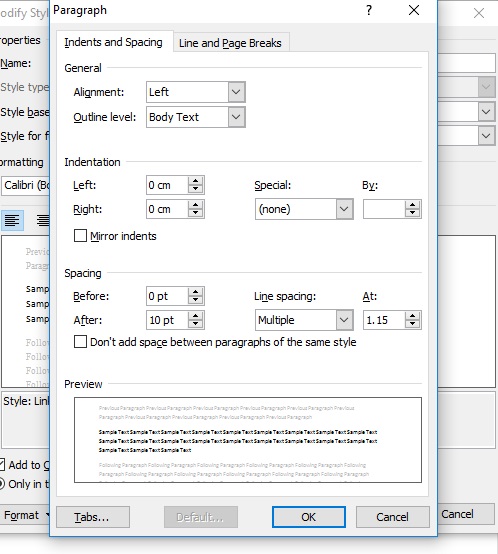 Step #5: Click on the first paragraph in your manuscript that comes after a chapter heading, subheading or blank line between sections. Click the “Normal firstline” button in the Styles pane.
 Repeat this step for every applicable paragraph in your manuscript. (It can be fiddly to spot them all, so you may want to make a note to watch out for any you missed when you proofread.)
#3: Chapter Titles
For the Kindle to recognise that your chapter titles are, in fact, chapter titles, you need to format them correctly. This means applying the Heading 1 or Heading 2 style. Either will work: I normally use Heading 1, but if you’ve divided your book into several parts, you could use Heading 1 for the part titles and heading 2 for the chapter titles. Here’s how to make it work. Step #1: (If you’ve already formatted chapter titles manually, e.g. by applying bold or resizing them). Click on the first chapter title in your document. On the Styles pane, click the “More” dropdown and then “Clear Formatting”.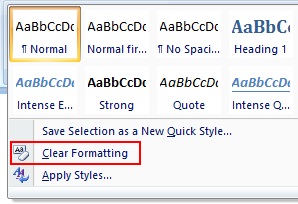 Step #2: Click on the chapter title (if you didn’t already do so for Step #1), then click “Heading 1” in the Styles pane.
 Repeat this for every chapter title in your manuscript.
You can, if you want, modify the Heading 1 style to make it a different colour, font, etc. from the default. The Kindle has its own defaults, though, and readers can customise font settings on their devices – so your changes won’t be reflected in the finished ebook.
Adding a Table of Contents
Once you’ve set up your chapter titles as “Heading 1”, you can then use Word to create a Table of Contents with just a couple of clicks. Step #1: Go to the start of your document (or the end, if you prefer to have the Table of Contents there) and click in a blank space. Step #2: Click on the “References” tab on the Word ribbon and click the “Table of Contents” dropdown.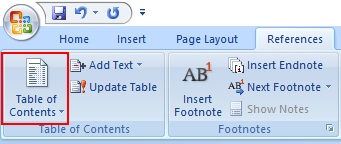 Step #3: Select “Automatic Table 1” by clicking on it.
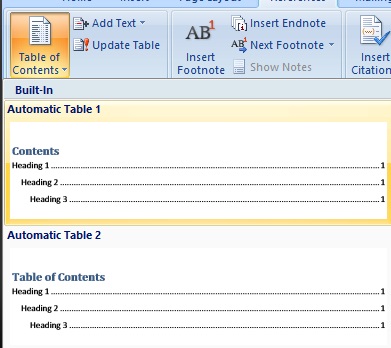 Step #4: You should see a table of contents at the start of your manuscript. The page numbers are automatically filled in for you.
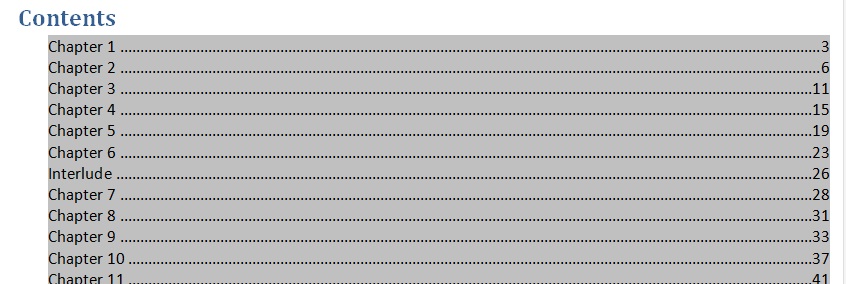 Note: Even if you don’t need a Table of Contents for your manuscript, this is a good way to check you’ve not missed out any chapter titles when formatting – if they’re not “Heading 1”, “Heading 2” or “Heading 3”, they won’t appear in the table.
And that’s it! If you get stuck with Styles or have any questions, just pop a comment below.
About

I’m Ali Luke, and I live in Leeds in the UK with my husband and two children.
Aliventures is where I help you master the art, craft and business of writing.
Start Here
If you're new, welcome! These posts are good ones to start with:
Can You Call Yourself a “Writer” if You’re Not Currently Writing?
The Three Stages of Editing (and Nine Handy Do-it-Yourself Tips)
My Novels

My contemporary fantasy trilogy is available from Amazon. The books follow on from one another, so read Lycopolis first.
You can buy them all from Amazon, or read them FREE in Kindle Unlimited.
11 Comments
Trackbacks/Pingbacks
- Editing Your Novel on Your Kindle: Creating a .Mobi File and Using Send-to-Kindle | Aliventures - […] If you’ve not yet got to grips with Microsoft Word’s Styles, I’d highly advise reading my post A Quick…


Thank you for sharing this!
Oh,I’m having a hard time o formatting my microsoft word kindle,good thing I find your site.
Amazing post. Thanks for the effort of sharing this tutorial with us. I really like reading this kind of posts since I learn more this way. I love teaching myself with computer staff over the internet. It really amazes me. Word is one of the most used apps and knowing how to maximize its use is really good. By the way, do you have any video blog post for this?
Thanks Michael, glad to help! I don’t have a video version of this one … but I’ll let you know if I create one in the future. 🙂
Oh my goodness I am beyond thrilled that your wonderful post has sorted out some of my formatting issues! I had reached a stand still but you have saved the day 🙂
Thank you, thank you, thank you!
Yay, so glad this helped! Formatting can be quite a steep learning curve the first time you tackle it … I promise it does get easier. 🙂
thanks for all the info here
questions:-
when in word 1. what font and font size to use? 2. can you use italix? 3. can you write as follows “Doesn’t think any of us…his children…are worth a damn.”
must you convert word to html before uploading?
1. Up to you! The Kindle only has a limited selection of fonts, and the font size can be adjusted by the user — so don’t expect it to necessarily look the same on the preview as in your Word document. I just use the Word defaults (Calibri, size 11).
2. Yes, you can use italics: just put them in as normal.
3. I’m not quite sure what you’re asking there? With an ellipsis (…), I always use three full stops (periods) in a row, rather than the slightly squished-together ellipsis character, because special characters can end up going weird. The simpler, the better! If Word autocorrects three full stops to a special ellipsis, tell it to knock that off. 😉 You can do that in the autocorrect settings.
Thanks for this and what about having to convert word to html?
Hi, Ali! I love this post. It’s very helpful, especially to me that’s new to self-publishing. I just want to know though how do you edit the dedication page or acknowledgment page. Cause I really love to put those pages in my book, you know, kind of like a real author. Anyway, I center align it and all and highlight it as heading 1 in Word, but at the published work it didn’t happen the way I want it to happen. (It’s in epub though, I use calibre). I would love to hear your thoughts about this. Thank you.
But of course you’re a real author, self-publishing or not! 🙂
I too use centre align for the acknowledgements page, and the copyright page. I just put them in normal text, though, not Heading 1. With the acknowledgement, I’d suggest actually editing the text itself to be larger (not using a Style) — it’s the one time I do that. It’s not a chapter heading so it’ll probably confuse Calibre if you put it in as a Heading 1 or Heading 2. Good luck with it! It’s a few years now since I’ve used Calibre, but I often used to find I had to try a few different things before the manuscript would comes out the way I want.